I’ve owned plenty of consoles over the years but PC has always been my preferred gaming platform. It used to be because I sucked at using a controller but these days I’m all about the flexibility a PC offers. As the Step Brothers would say, it has so much room for activities.
I was lucky enough to have a stepdad who was into computers when I was growing up and he taught me most of what I know when it comes to building, maintaining and troubleshooting PCs. Even with that background, I still get overwhelmed with new builds given how fast components and standards change. I can’t imagine how intense the experience must be for beginners keen to wet their whistle in the PC gaming world.
With a new generation of consoles now available, it’s the perfect time for those who’ve been considering a custom build to dive in. I usually time new builds with major console releases because if your PC can keep up with those, it’ll serve you pretty well until the next console cycle, so around 7 years or so.
Here are a few things to consider before we get building.
PC advantages
A PC can be so much more than a gaming platform. For me, it’s a workstation when I’m not in the office, a tool for writing songs and recording demos for my band, a recording station for podcasts and more. In other words, it can do anything I need a computer for and when you factor all that in, the price becomes way more justifiable.
PCs are also easily upgradeable, so when you feel like boosting its performance, some additional RAM or a new graphics card in a couple of years will put you even further ahead of consoles in terms of performance. Adding extra hard drive space is also easy and reasonably cheap.
The variety of games you have access to on PC is also massive. Consoles are improving when it comes to supporting indie developers, but the breadth of what’s available on PC is insane. Hell, if you feel like taking a stroll down memory lane and playing something you loved from the 90s, chances are you can probably grab it from somewhere like GOG.com.
Discounts for PC games also tend to hit harder when sales are on as well, so something else to consider there.
PC disadvantages
The biggest disadvantage when comparing a gaming PC to a console is the price. A rig that’ll keep up with next-gen games is gonna cost you upwards of $2,500, which certainly isn’t cheap.
PCs can also be fiddly if something goes wrong but in most cases can be easily fixed. Thanks to the internet, there’s likely already a ton of walkthrough videos for how to sort out that exact issue. To turn this into a positive, I learnt more about computers through troubleshooting problems than I would have anywhere else. A silver lining, if you will.
If you’d rather not have to tinker with the guts of your PC, there’s no shame in buying a pre-built gaming PC with a warranty. You can buy ready-to-go gaming PCs from brands like HP or Dell, or go to somewhere like JW Computers which does made-to-order customisable gaming PCs. Either way, if something goes wrong, you’ll have somewhere to help you sort it out under warranty. Of course, the build fort he latter option will incur an extra cost.
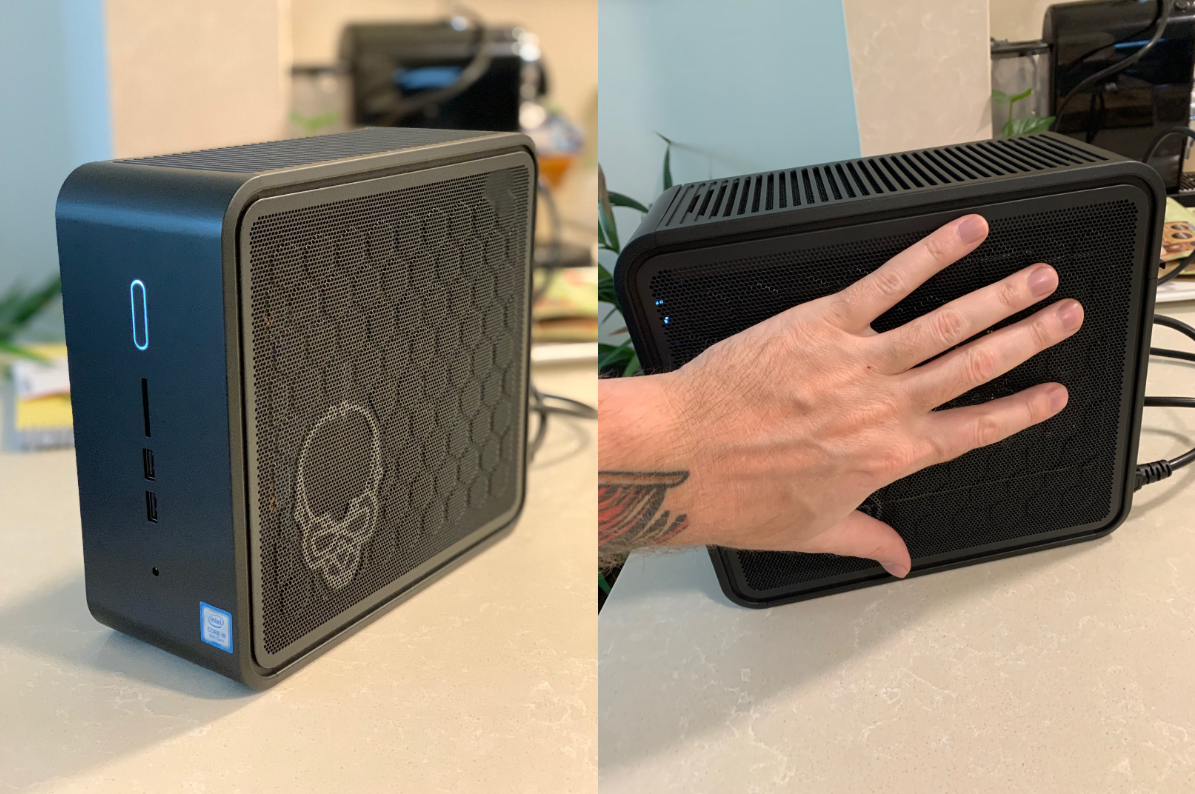
If the physical size of a PC is a concern, Intel makes high-powered gaming rigs that are smaller than the PS5 and Xbox Series X. The Intel Nuc is a great option for anyone with limited space because as you can see, it’s about as big as my damn hand.
Moving onto the build, you’ve got a couple of options. You can build something as close to the technical specs of the PS5 or Xbox Series X as possible, or future-proof yourself with something a little beefier. I tend to go for the latter, which is what I’ve done again this time around, but I’ll also drop in some options for the former as well if that’s more your speed.
Below is everything you need to build the tower of your PC and a little bit about what each component is and what it does. For the console-spec options, I’ve drawn from a really great piece my pal and editor of Kotaku Australia, Alex Walker, wrote here. He also goes into the kind of PC you can make for the cost of a next-gen console, so it’s well worth a gander if you’re on a tight budget. We won’t factor a monitor or peripherals into this cost, but I’ll show you what I’m using towards the end so you have an idea of options there as well.
Let’s get started.
CPU
The CPU, or central processing unit, is essentially the brains of a PC. It handles all of the algorithmic processes that happen when you do just about anything.
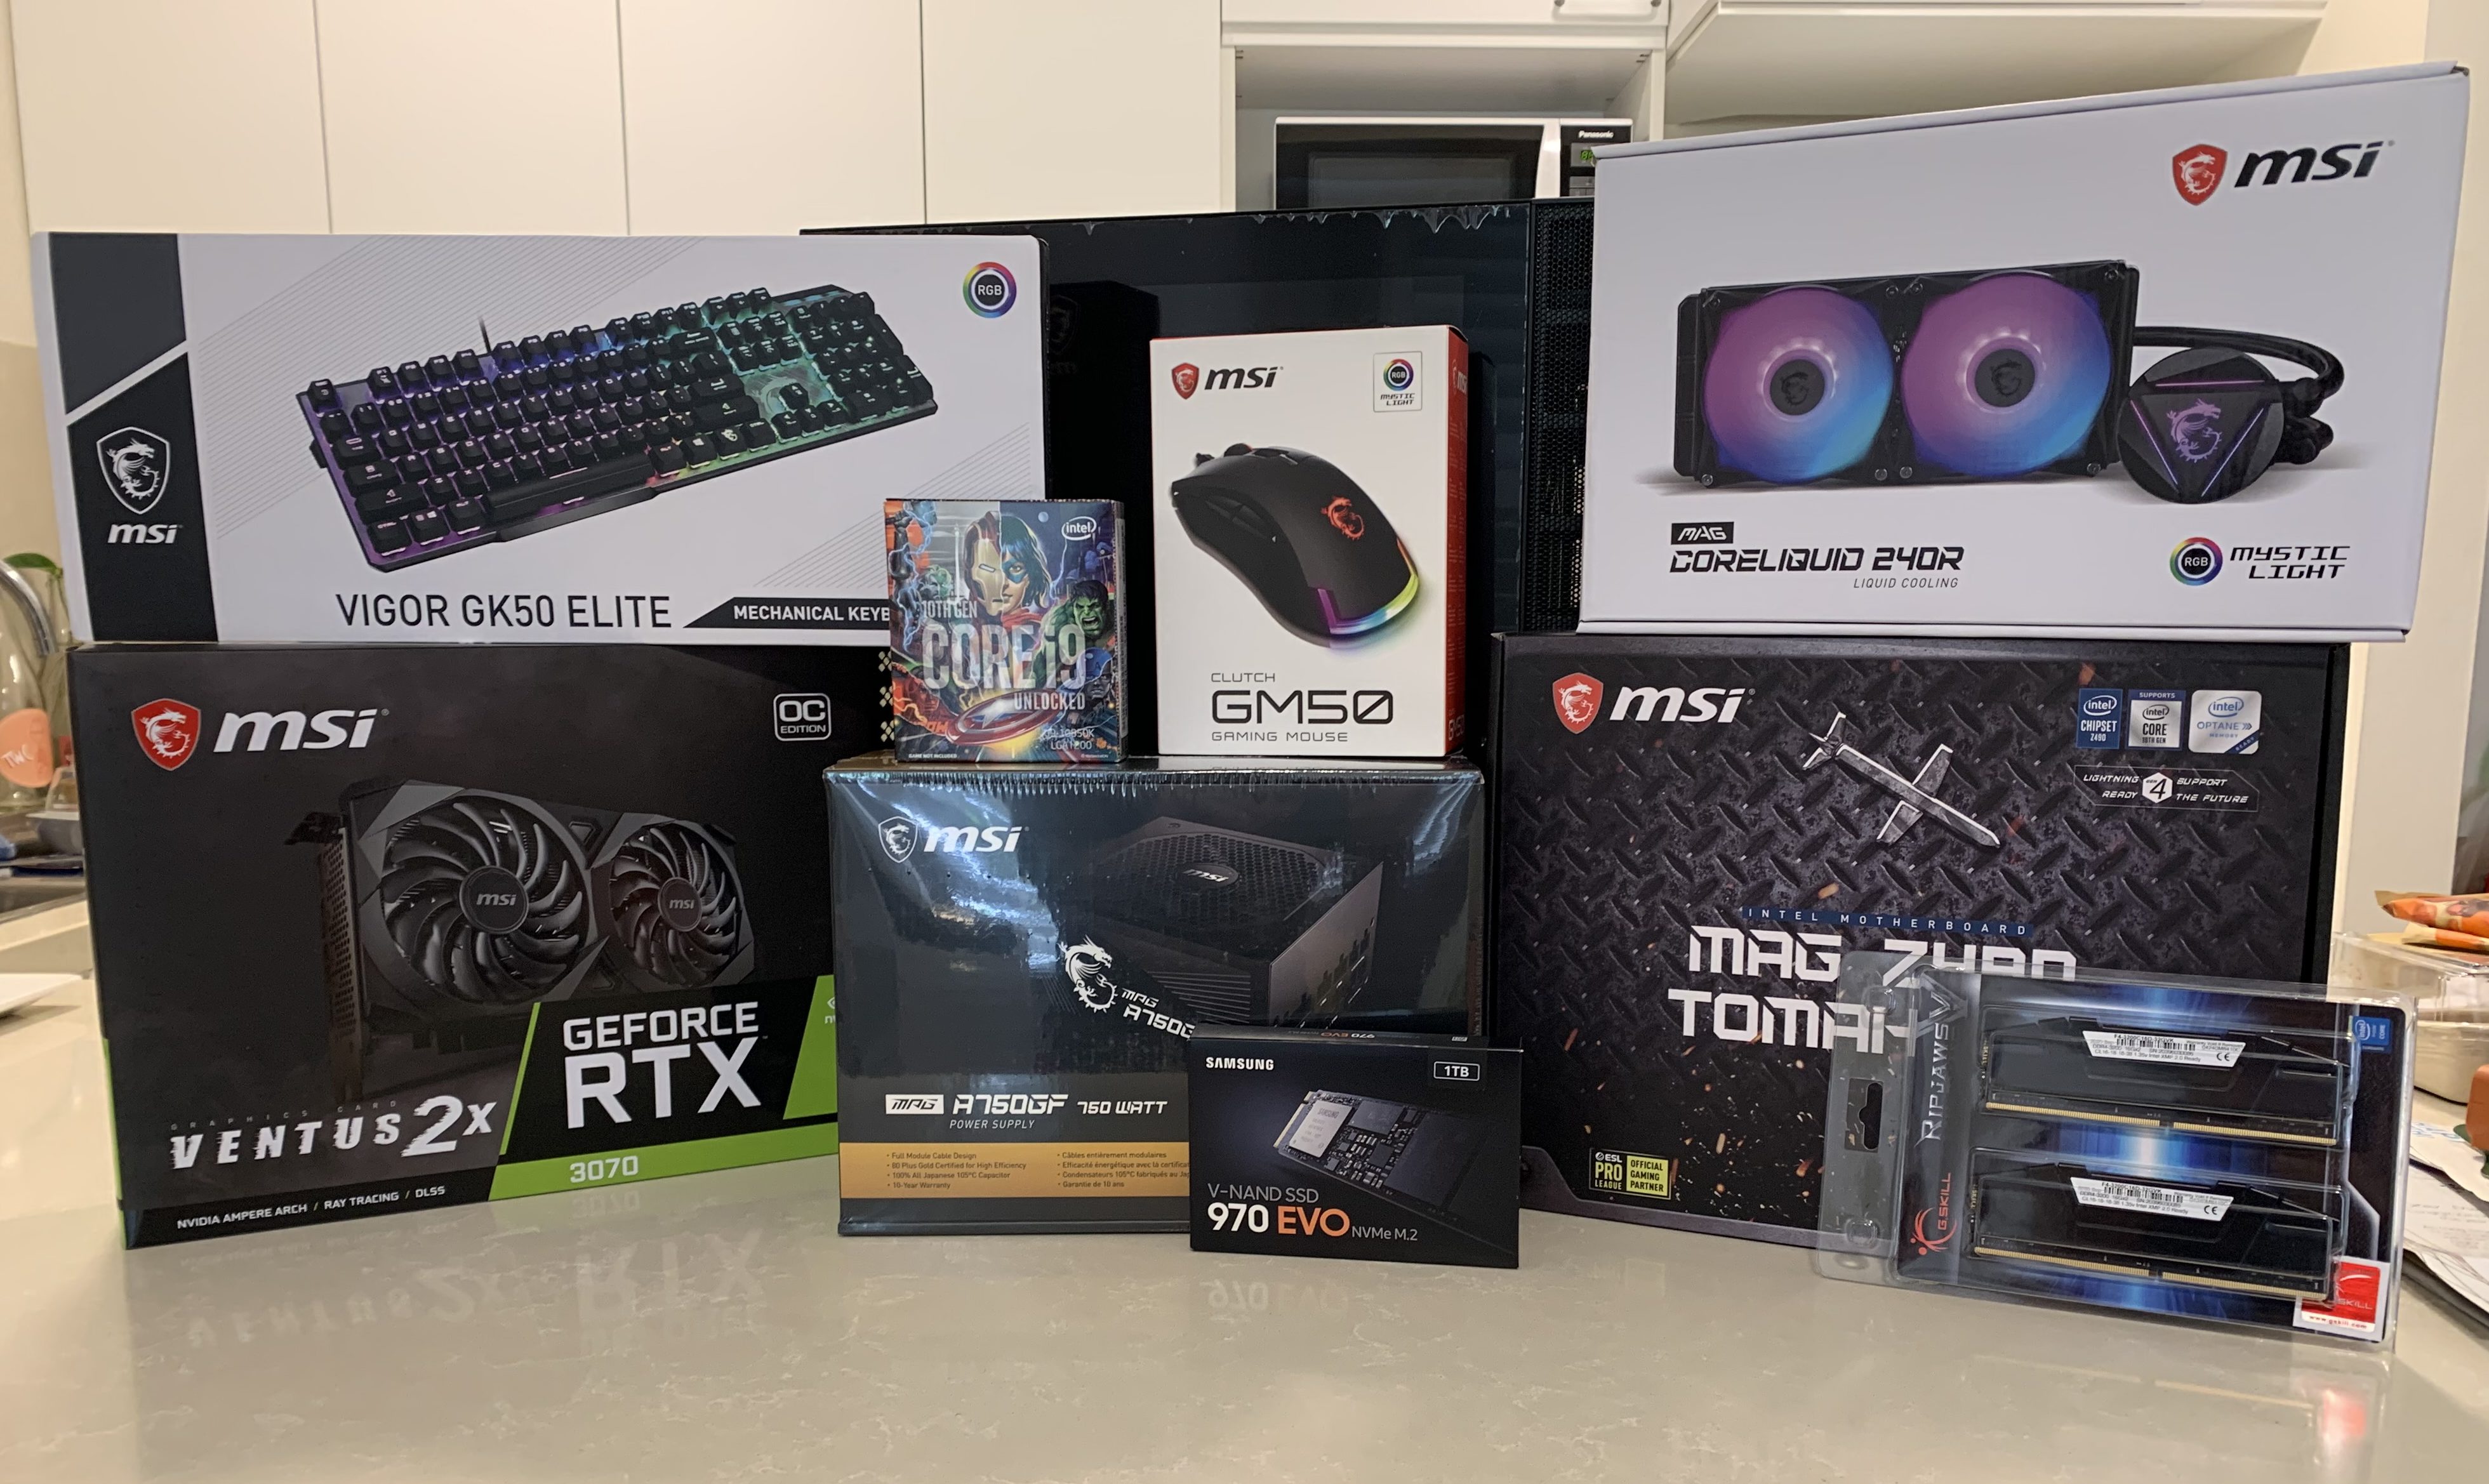
Intel very kindly provided me with a 10th Gen Core i9 10850K, which is more than enough to handle next-gen games. This 3.6GHz processor retails at around $679.
![]()
For the next-gen console build, Alex has suggested the AMD Ryzen 5 5600X 3.7 GHz 6-Core Processor, which is around $469.
CPU cooler
Some CPUs will come with a heatsink and fan cooler, others will come by themselves, which means you’ll have to source a cooling option yourself.
As you’ve probably already guessed, this component keeps the CPU from overheating. If it does overheat (generally around 100 degrees celsius) it’ll force the computer to restart to prevent damage, which is good, but an indicator that something’s not right, not to mention a pain in the ass. You don’t want this.
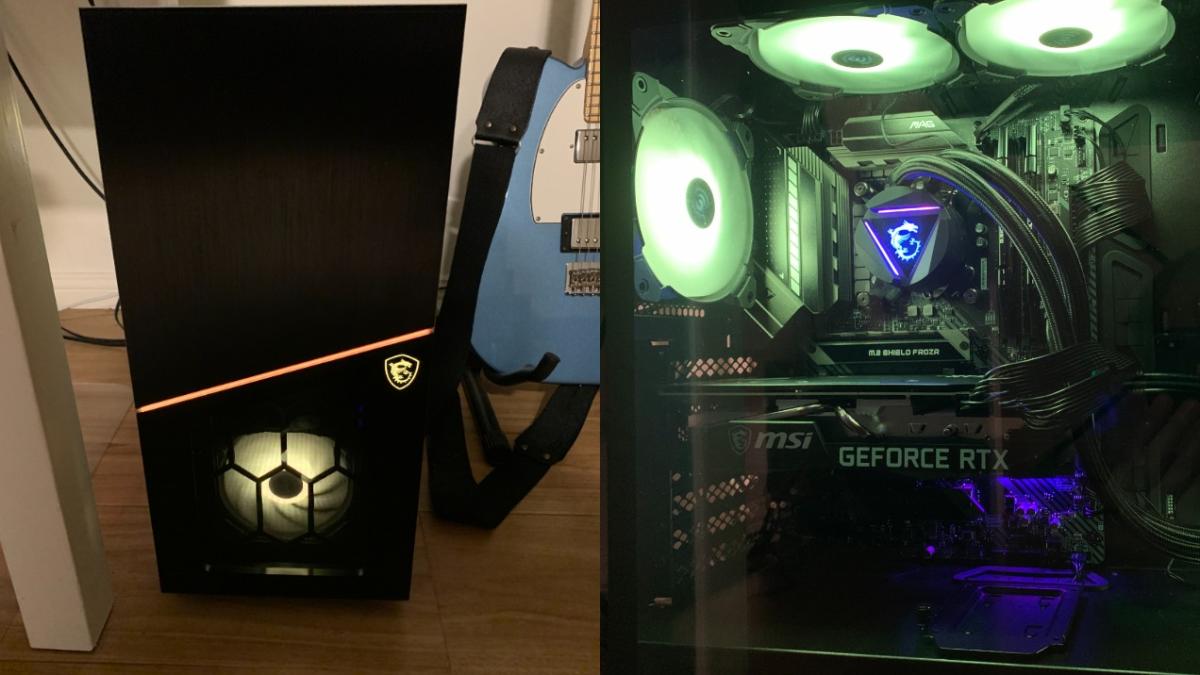
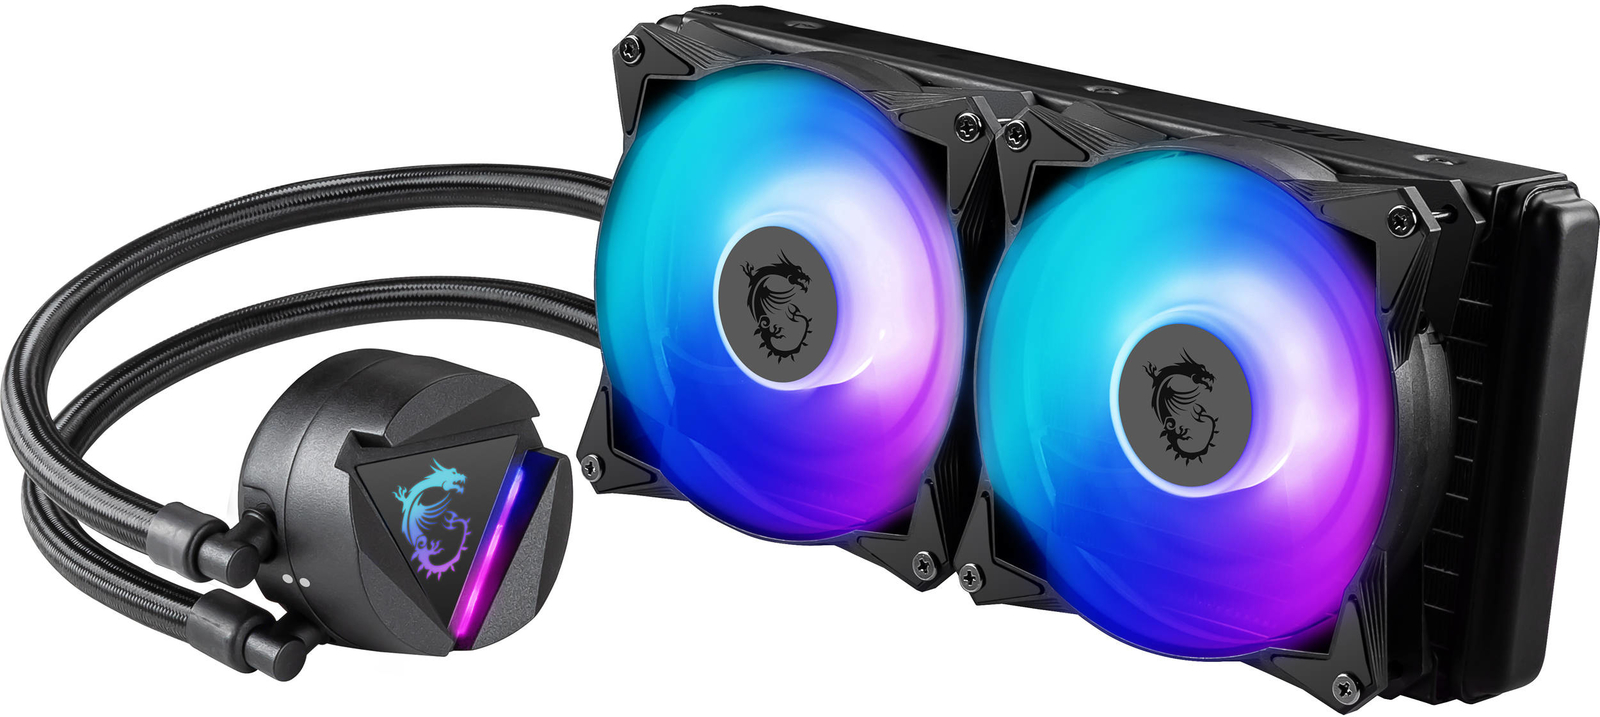
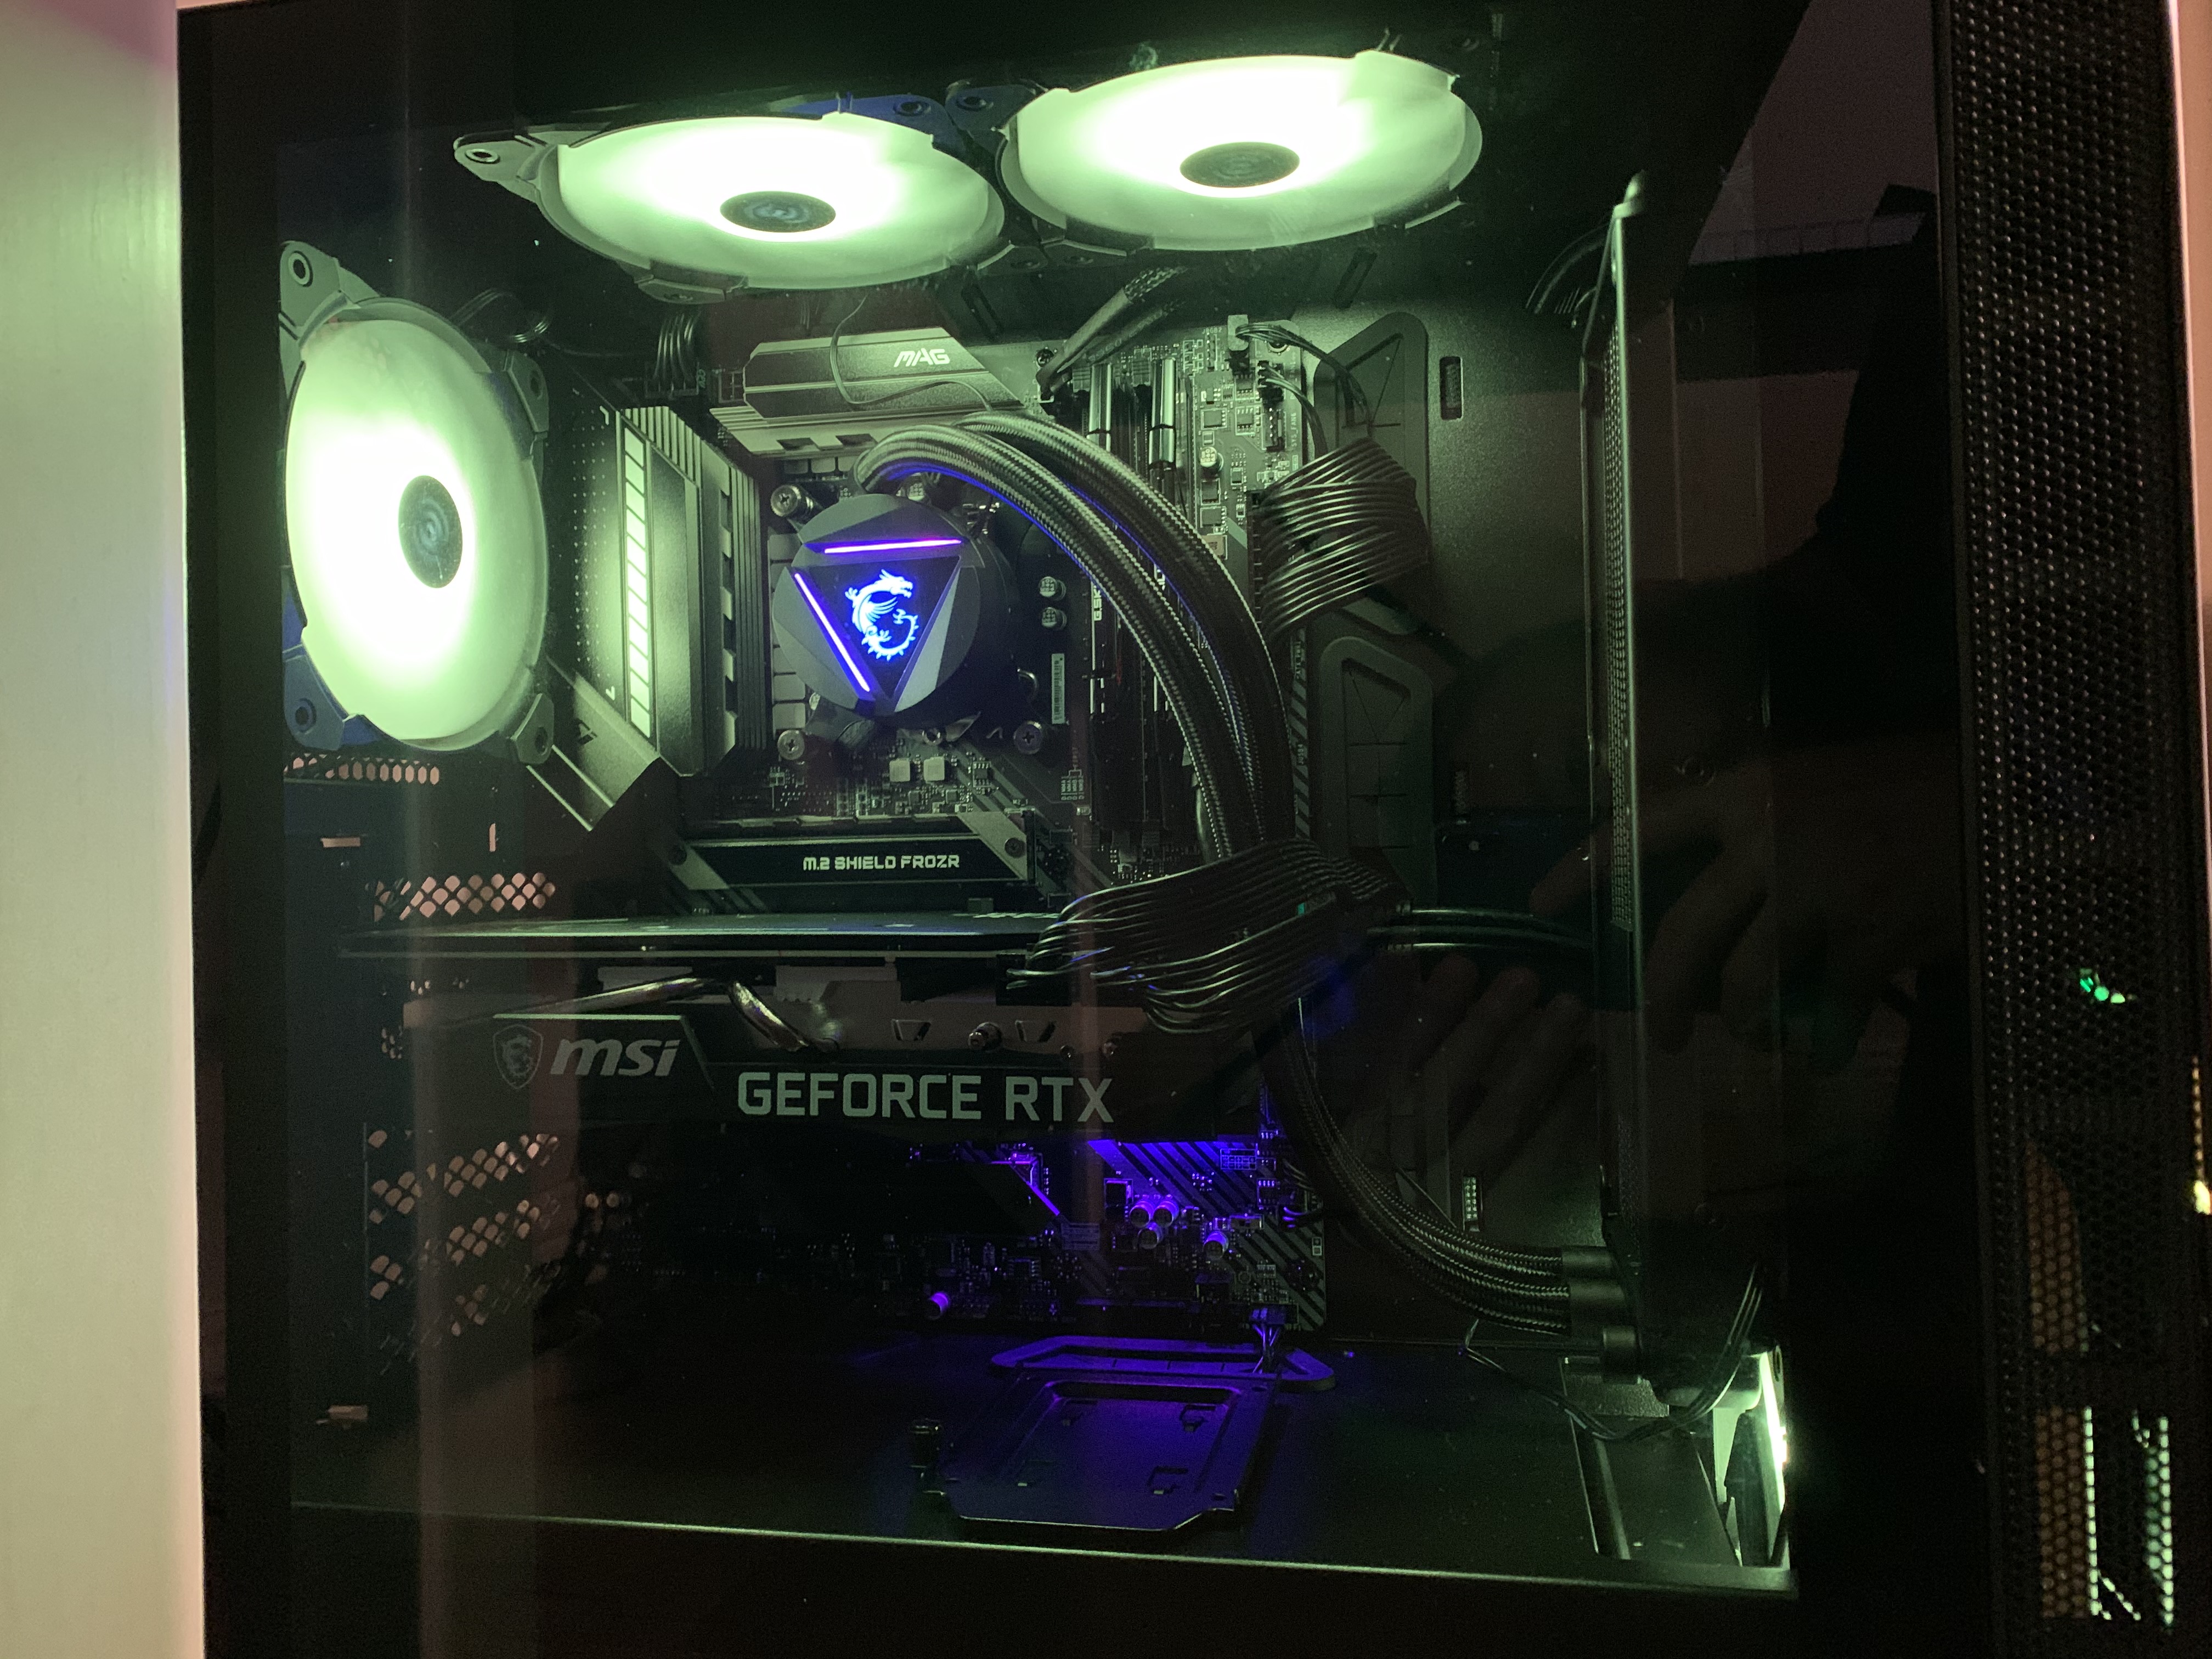
For my setup, MSI very kindly provided me with a MAG Coreliquid 240R, which is an all-in-one liquid cooler. These retail for between $169 and $207.
If you’d prefer a fan and heatsink cooler, the Noctua NH-D15 has been praised as a great solution for 10th Gen Intel chips, which is actually more expensive at $179. There are cheaper solutions, like this Cooler Master heatsink and fan for $87.46, but I’d do plenty of research before pulling the trigger on anything under $100. The last thing you want is to have to faff around with an overheating CPU because you cheaped out on the cooler, you know?
Alex’s AMD CPU suggestion comes with a fan and heatsink, so that’s a big fat $0 for 3rd-party cooling.
Motherboard
Some people say building a PC is kinda like adult Lego, which makes the motherboard like the big flat base you build everything onto. It houses or connects to every other component of your PC in some way.
The main thing to note with the motherboard is that different CPUs require different sockets, so make sure the one you get is the right fit for the CPU you’ve chosen.
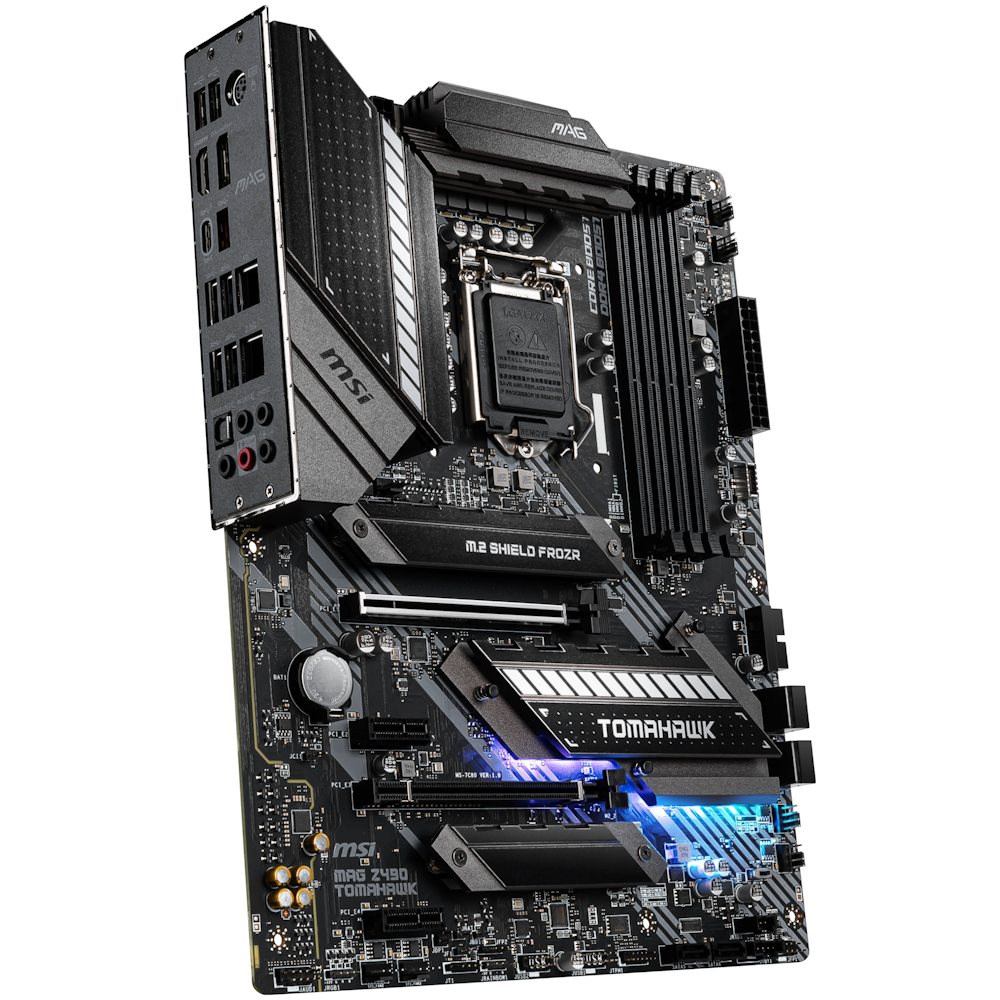
For my build, I have an MSI MAG Z490 Tomahawk, which retails for around $349.
Alex’s next-gen build recommends the ASRock B550 Pro4 ATX AM4 Motherboard, which is $209.
RAM
If you’ve seen the classic British sitcom The IT Crowd, you’ll no doubt remember this absolute knee-slapper.
Moss is absolutely right, memory is RAM, which stands for random access memory. Basically, RAM is a source of fast, short-term storage for applications to put their shit while they operate.
You can kinda think of RAM like workbenches in a warehouse. The more workbenches a warehouse has, the more space workers (applications) have to put their tools when working on a task. The more RAM a computer has, the more it can run before turning into a sluggish beast.
Most current gaming rigs will run 16GB of RAM but because I like to future-proof myself a little more, I bought 32GB of G.skill Ripjaws V DDR4 RAM with a frequency of 3200Mhz, which was $167. There’s a lot of words there, but the main things to note are the size (32GB), the data rate (DDR4 is pretty well the standard right now) and the frequency (3200Mhz).

When it comes to frequency, there’s a bit of debate around what’s best, but I found this video to be a good resource.
Alex’s suggestion is Corsair Vengeance LPX 16 GB (2 x 8 GB) DDR4-3200 CL16 Memory, which is $115.
GPU
GPU stands for graphics processing unit, otherwise known as a graphics card. This is the most important part of a gaming PC and probably where you’ll drop most of your cash.
A graphics card is where all the visual elements of a video game are processed, so the better this is, the better your games will look and run.
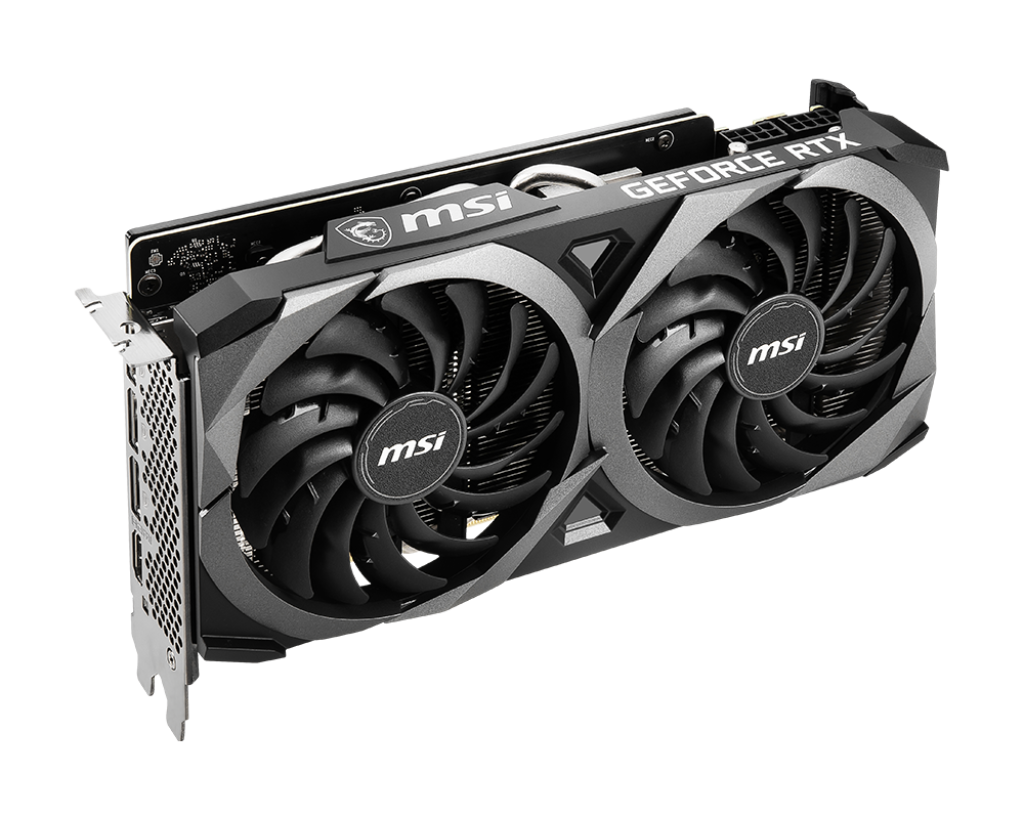
My build contains an MSI Nvidia GeForce RTX 3070 Ventus 2X, which goes for around $949.
Alex’s build has also gone for a 3070 card, but a different variant — the Inno3D RTX 3070 Twin 2X OC 8GB, which is $869.
Storage
Very straightforward — storage is where you put all of your shit. Just as your phone and consoles have storage capacities, so do gaming PCs. There are a few options for this but if you wanna keep up with the next-gen consoles, you’ll want at least one M.2 SSD drive. I won’t go into how this is different from other types of SSD storage, but if you’re interested, there’s a good explainer here.
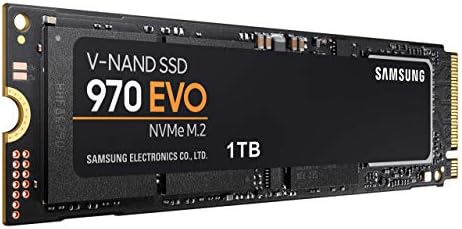
I’m starting with 1TB of space in my rig but will probably add more in the near future. I went with the Samsung 970 EVO 1TB NVMe 1.3 M.2, which cost me $177.
Alex actually went and straight-up added 2 drives to his build, the Crucial P1 500 GB M.2-2280 NVME Solid State Drive ($86.00) and the Samsung 980 Pro 1TB M.2-2280 NVME Solid State Drive ($369).
Case
Your case houses your computer and while it might seem like a fairly benign part of the build, choosing the right one is important, especially for a gaming PC.
Because it’s going to be working hard to run all of your games, it’s gonna generate heat, so good airflow is important. If aesthetics are important to you, you’ll probably want something that looks cool as well. It’s all about getting the right balance.
Because my cooler and fans have programmable RGB lights, it would be silly to get a case that shuts that prettiness into a box, so MSI sorted me out with a Sekira 100R case. It has a glass side and a half-glass front so I can see what’s going on inside. It looks rad and has plenty of room for air intake on the sides of the front panel. These go for between $203 and $247.

Alex went with an NZXT H510i ATX Mid Tower Case for $195.
Power supply
Pretty self-explanatory, the power supply unit, or PSU, provides power to your PC via your regular-ass wall outlet. That’s pretty much it.
You don’t wanna cheap out here though because you want your expensive components to receive clean power, something cheap PSUs can struggle with.
My build uses the MSI MPG A750GF 80+ Gold 750W power supply which uses quality parts and comes with a 10-year warranty. It goes for between $199 and $239.

Alex used the SeaSonic FOCUS Plus Gold 650W 80+ Gold Certified Fully Modular ATX Power Supply, which is usually $159.
Operating System
The operating system, or OS, is just what we call Windows 10, which is what the huge majority of gaming PCs use.
Both builds can cop this for around $129.
This brings the totals to:
My future-proofed build: $3,028
Alex’s next-gen console equivalent: $2,600
Both are pricey, absolutely, but remember that PCs can do a lot more than consoles, so if you can factor those other things into the cost, it could be a good option for you. If you’re just in it for the gaming, a console may be the better way to go. At the end of the day, it’s all up to you.
For those forging ahead with the build, let’s get stuck in.
The Build
Here’s the thing, I could tell you exactly how I put mine together but no two builds are exactly the same, so it probably wouldn’t do you any good. Instead, I’ll give you the gist of what I did during each step, some important things to look out for and some resources I think will really help contextualise the process.
If you want a comprehensive step-by-step guide for beginners, I found the below to have the most detail, particularly when it comes to plugging everything into your motherboard.
I’ll give a kind of guided tour through my build for comparison. Let us begin.
Prepare a workspace and your case
A clean, non-conductive benchtop is the best and most comfortable place to build but if you have to use the floor, that’s alright as well. Try to avoid carpet if you can as PC components are sensitive to static electricity. Regardless of whether there’s carpet around or not, make sure you ground yourself by touching some metal before you touch any components. There are special bracelets you can buy that take of care of this for you if you’d rather not think about it.
The first thing I like to do is take the case apart so it’s ready for the build. At the very least, both sides of a case should come off. In some circumstances, like with the MSI Sekira 100R case I’m using, the top, sides and front will come off. You don’t always have to take the front off but because I was shifting some fans around, I did.
Bust out the motherboard, CPU, SSD and RAM
Next, take your motherboard out and put it on a non-metal, clean surface. I do what most builders do and just use the top of the box it came in.
Before you mount the motherboard in your case, you’ll wanna add a few components to it. First up is the CPU. Grab that bad boy and take it out of the box. Be SUPER careful not to touch the exposed CPU socket on the motherboard or the underside of the CPU. The pins are extremely delicate and easy to bend, so take your time with this.
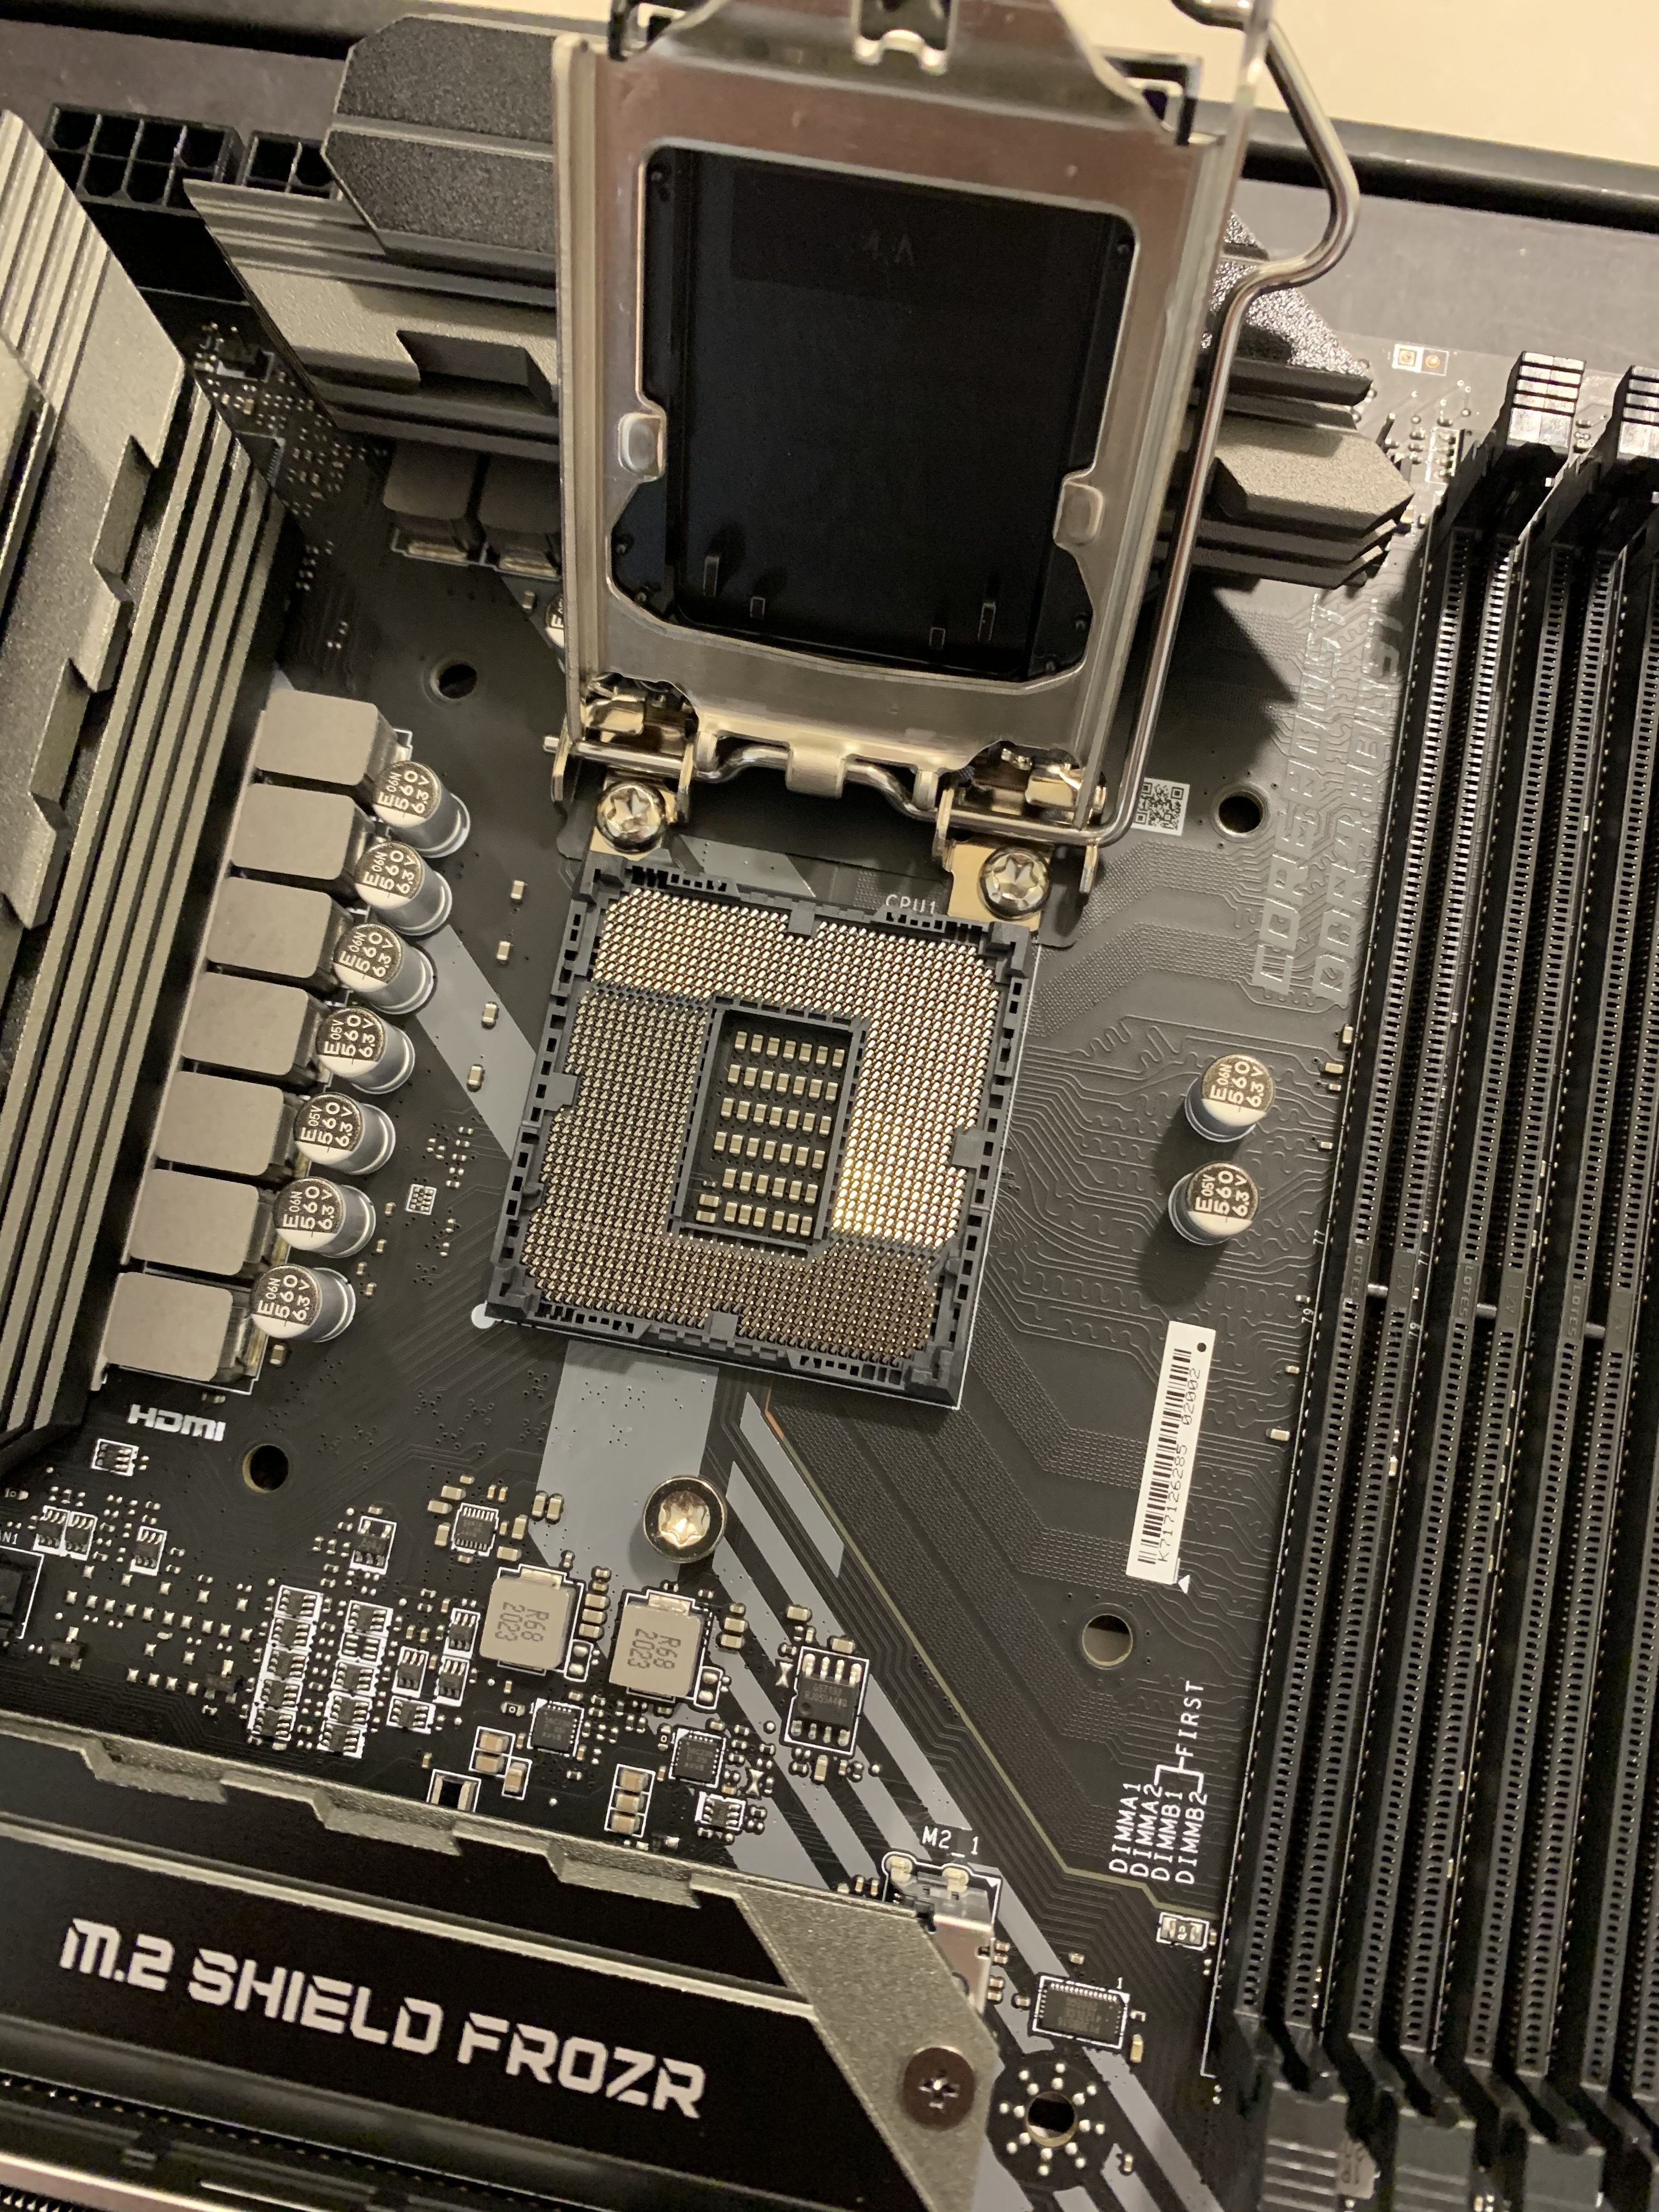
How the CPU is actually mounted depends on the motherboard you have, so make sure you suss the manual first. You can also search YouTube for instructional videos for your particular motherboard which might make it easier to visualise.
The video below has a heap of details and tips worth knowing.
Next, I put the RAM in, which is maybe the easiest part of the whole process. Just move the locking clips on the RAM slots down (to the right of the CPU), line up the notch in the RAM with the slot and press it down until it clips into place.
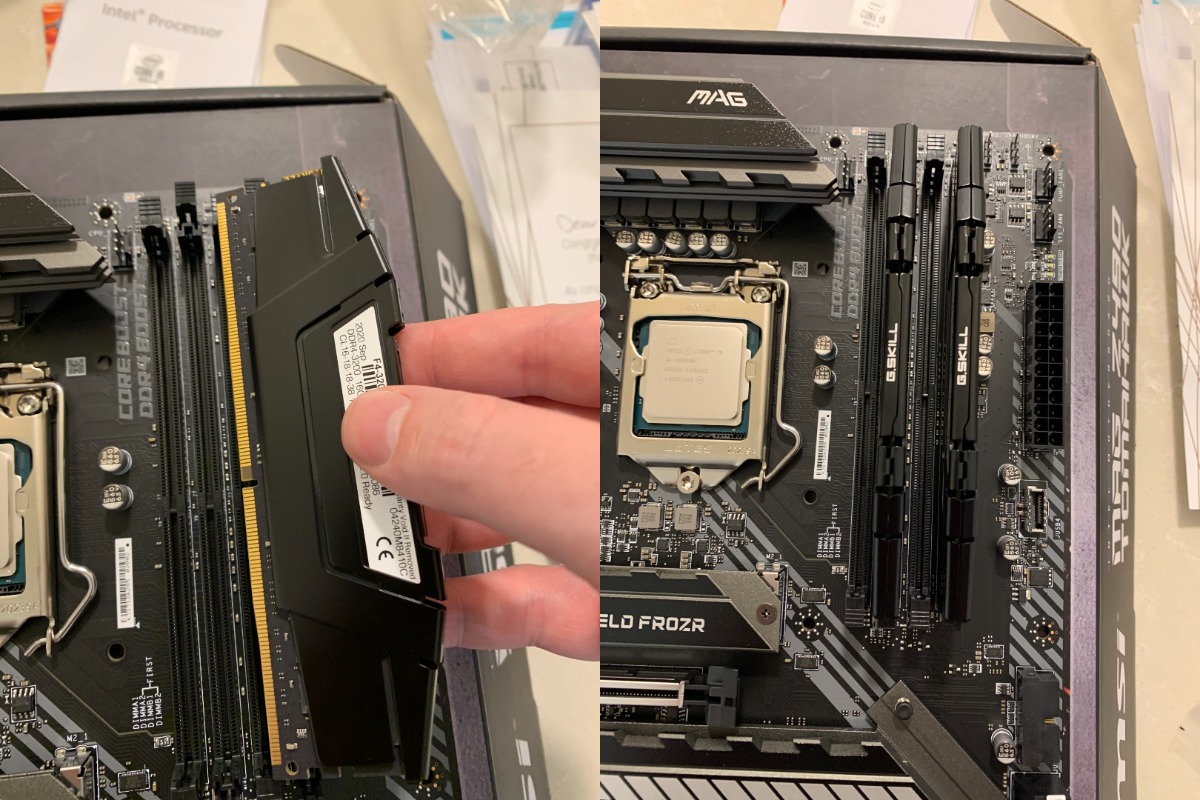
For most motherboards, the correct slots are the outside slot and then one across, which you can see in the picture above. Seems weird, I know, but these slots have a direct line to the CPU and will give you the best performance.
After that, I installed the CPU cooler mount. For my watercooler setup, I found it easier to install the mount first and whack the water head on once the motherboard and cooler radiator were in place in the case. The order you do it is completely up to you, that’s just how I prefer it.
I’d never installed an all-in-one (AIO) cooler before and found the video below extremely helpful.
Next, I installed the SSD drive by unscrewing the heatsink, inserting the drive at an angle, screwing it down into place with a small screw and returning the heatsink. If there’s plastic on the bottom of the heatsink, be sure to peel it off before screwing it back down.
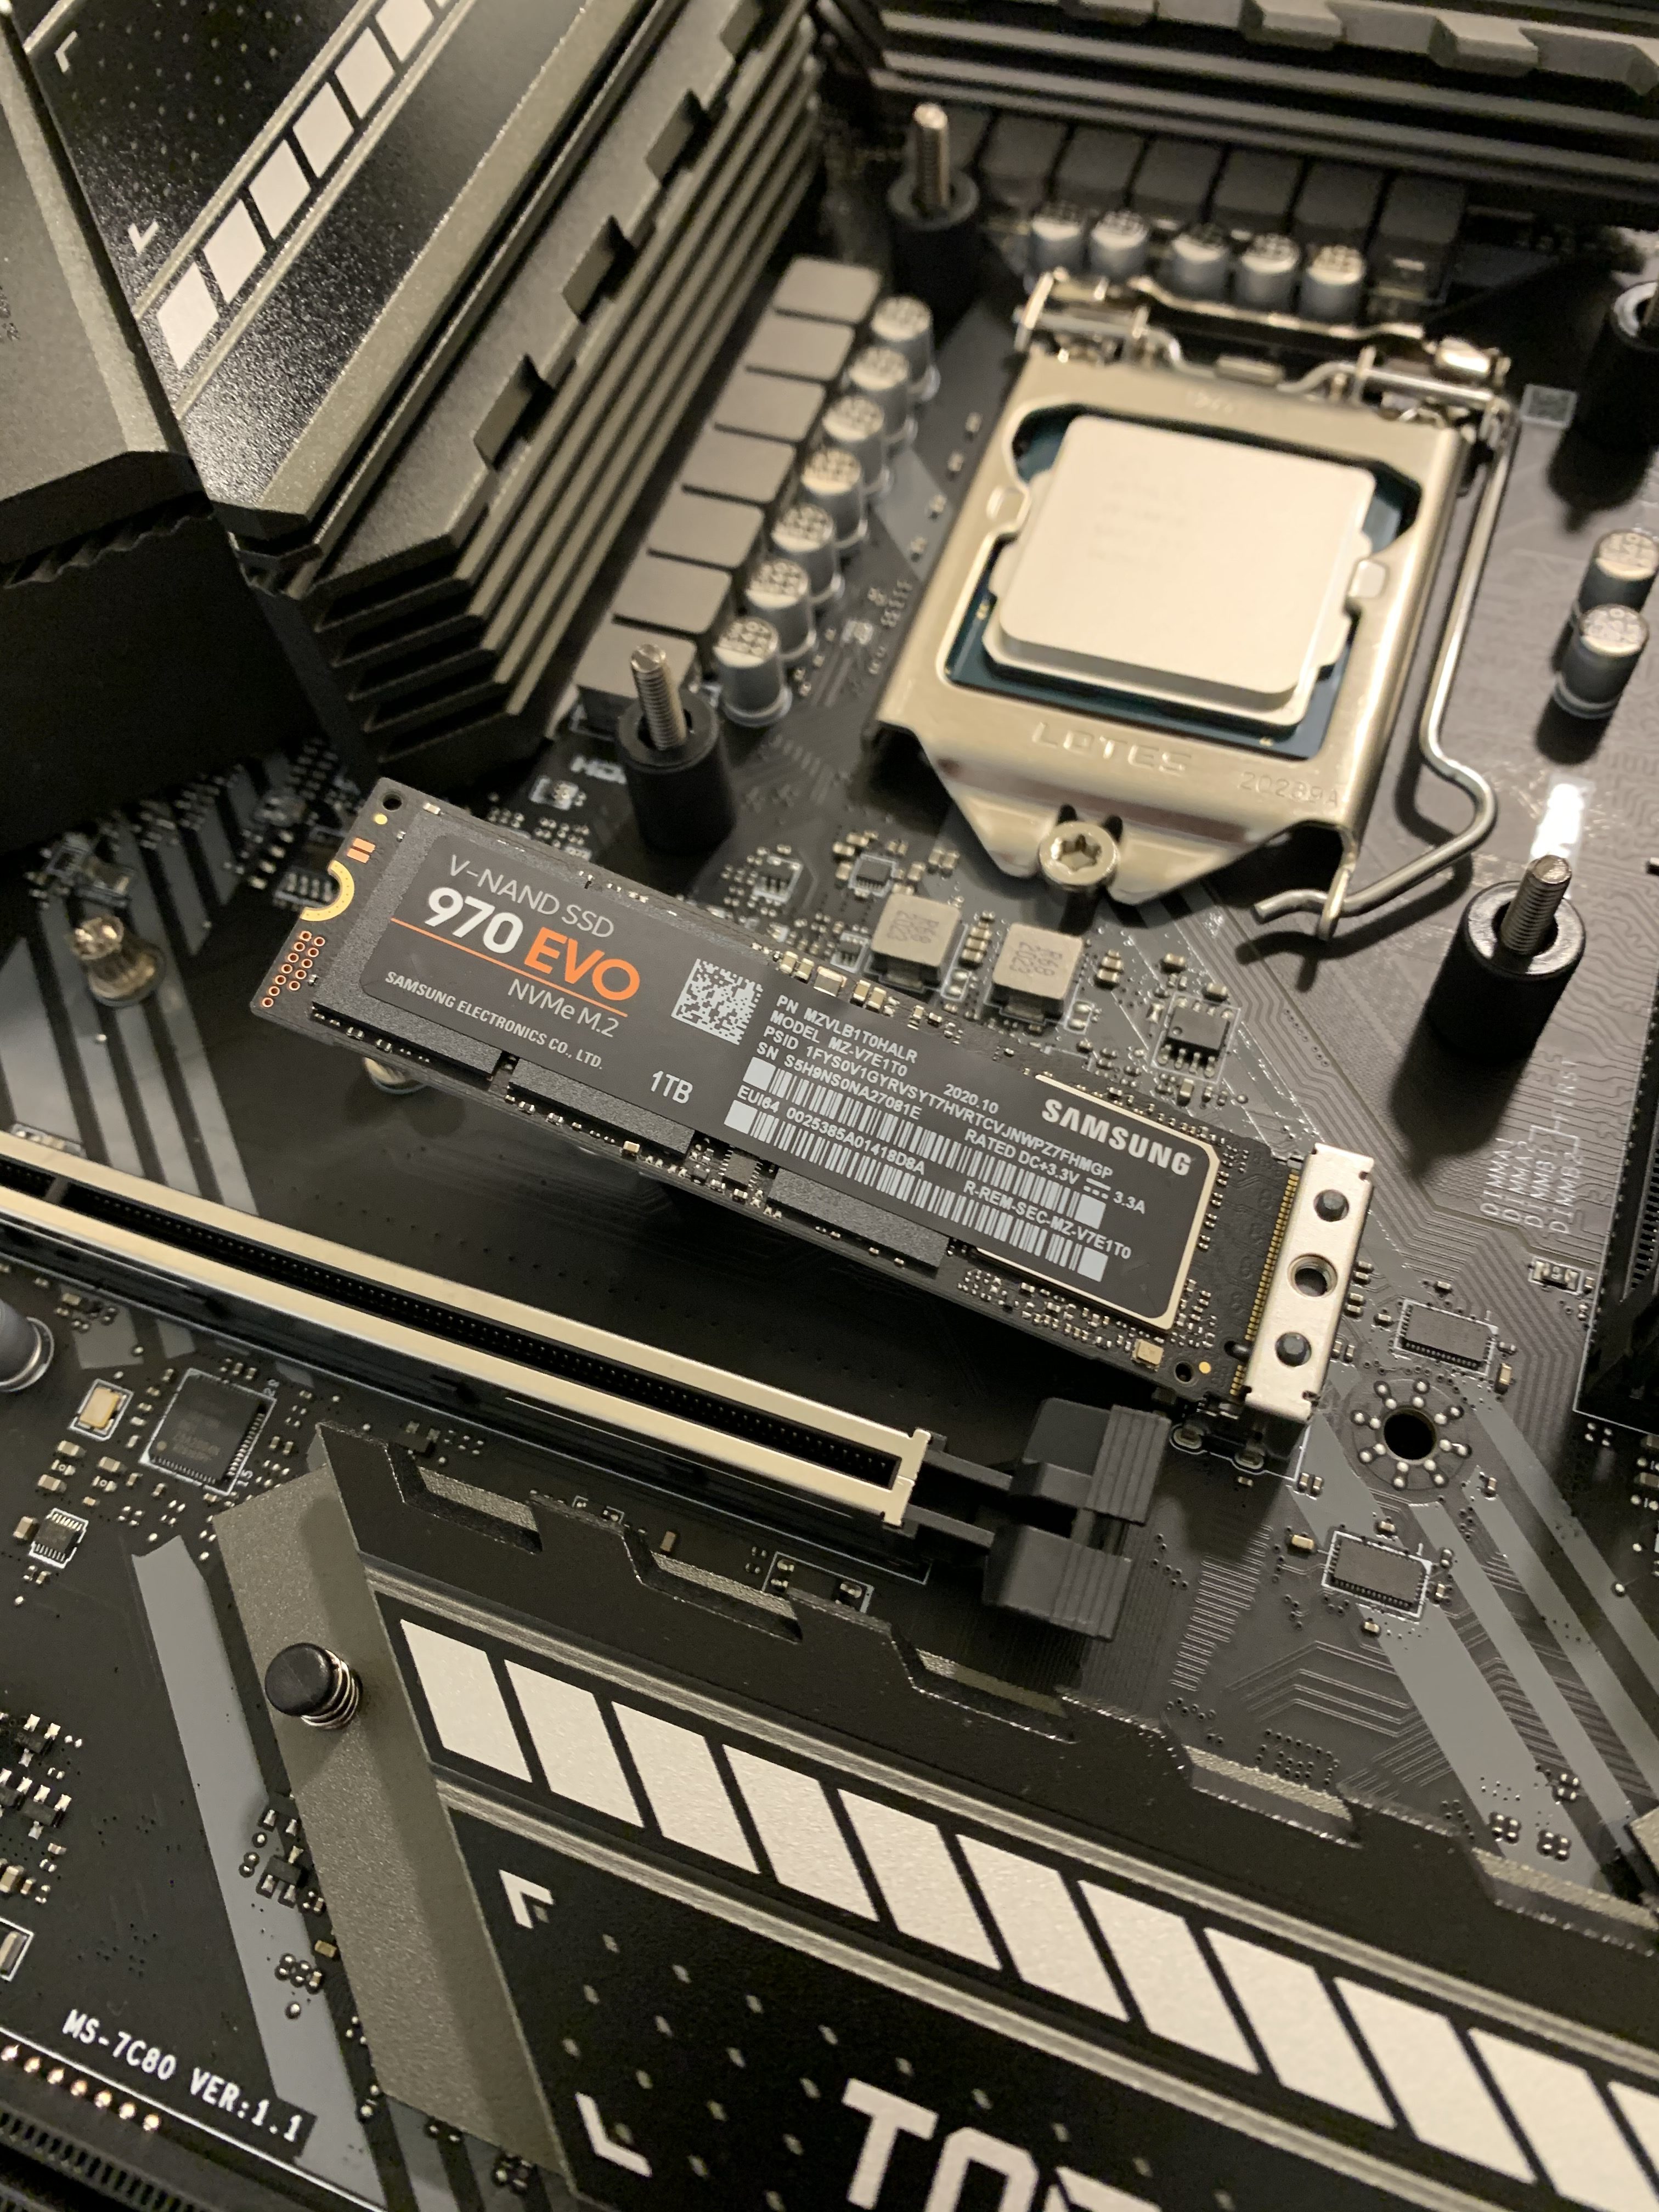
The video below is a good demonstration of this, sans the heatsink.
Screw fans in and suss your radiator placement
With an AIO water cooler, you need to mount a radiator inside the case. There’s a dizzying amount of conflicting opinion when it comes to where the best place to mount a radiator is, but I ended up going for the front of the case. After a lot of research, I mounted my radiator at the front of the case with the tubes down, making sure it’s positioned higher than the water block (an explainer on that here).

The fans at the front of the case pull cool air through the radiator while the fan at the back and two I place at the top of the case later in the build exhaust hot air out. It’s a good idea to monitor the temperature of your CPU and GPU while gaming once everything’s up and running to make sure the configuration you choose is working efficiently. I use Core Temp to check the CPU temp and plain old Task Manager (Ctrl + Shift + Esc, then click the Performance tab) for the GPU. Some games, like Call of Duty: Black Ops Cold War, let you monitor GPU temp in-game, which was a major component of my testing.
Under load, my GPU never goes above 80 degrees Celcius, which is fine. At 85 degrees, the card will likely begin to throttle back performance to lower temps. I might try some different cooling configurations down the track, but I’m pretty confident this one will serve me just fine.
Mount the motherboard and water block
Once the radiator was in place I mounted the motherboard, which is as simple as placing it where it goes in the case (the mounts should line up with the holes on the board) and screwing it into place with 9 screws. Don’t screw it in insanely tight, just make sure it’s tight enough to hold it in place.
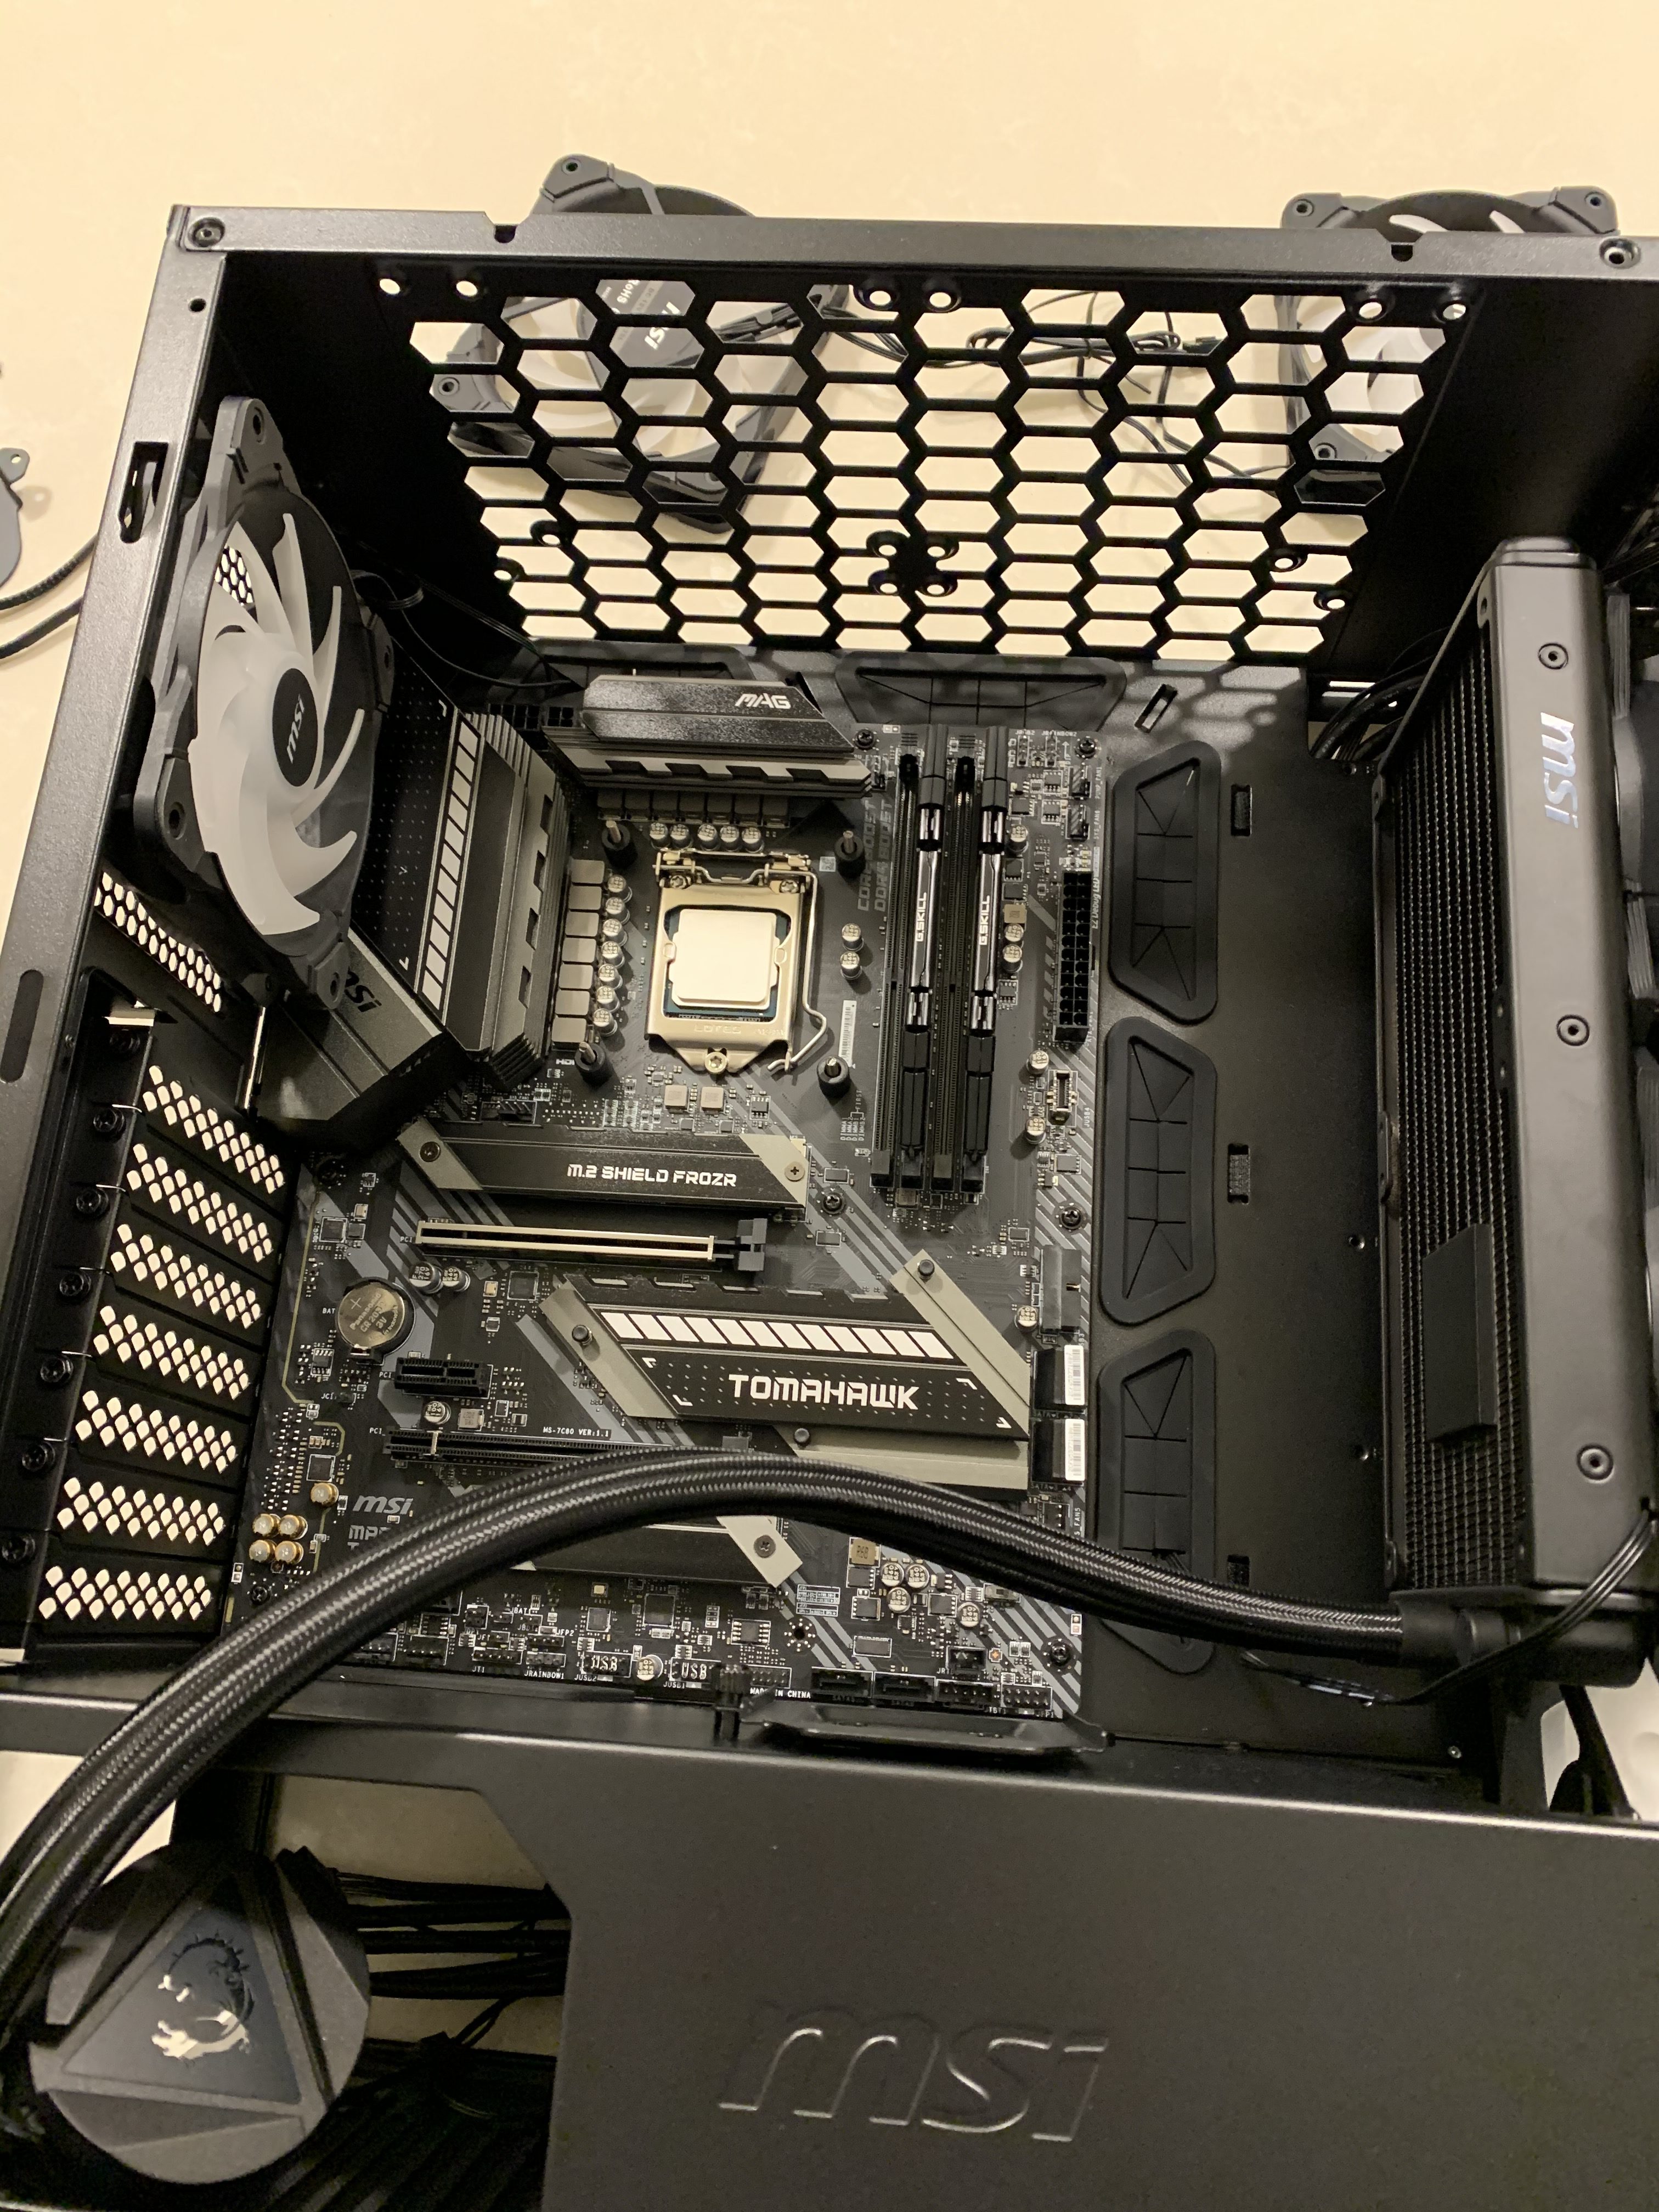
With the radiator and motherboard in place, I could twist the water block into the best position for mounting. Before whacking it on, make sure the plastic is peeled off the water block and thermal paste is applied to the CPU, which is important for proper heat transfer. You really don’t need to add much – a pea-sized dot in the middle of the CPU will do. Again, this video is super helpful for these steps.

Once screwed into place, I screwed the two fans I mentioned earlier into the top of the case.
Get wiring
Frankly, wiring is a pain in the ass. It’s a part of PC building I really dislike but like everything else, there are plenty of helpful resources out there.
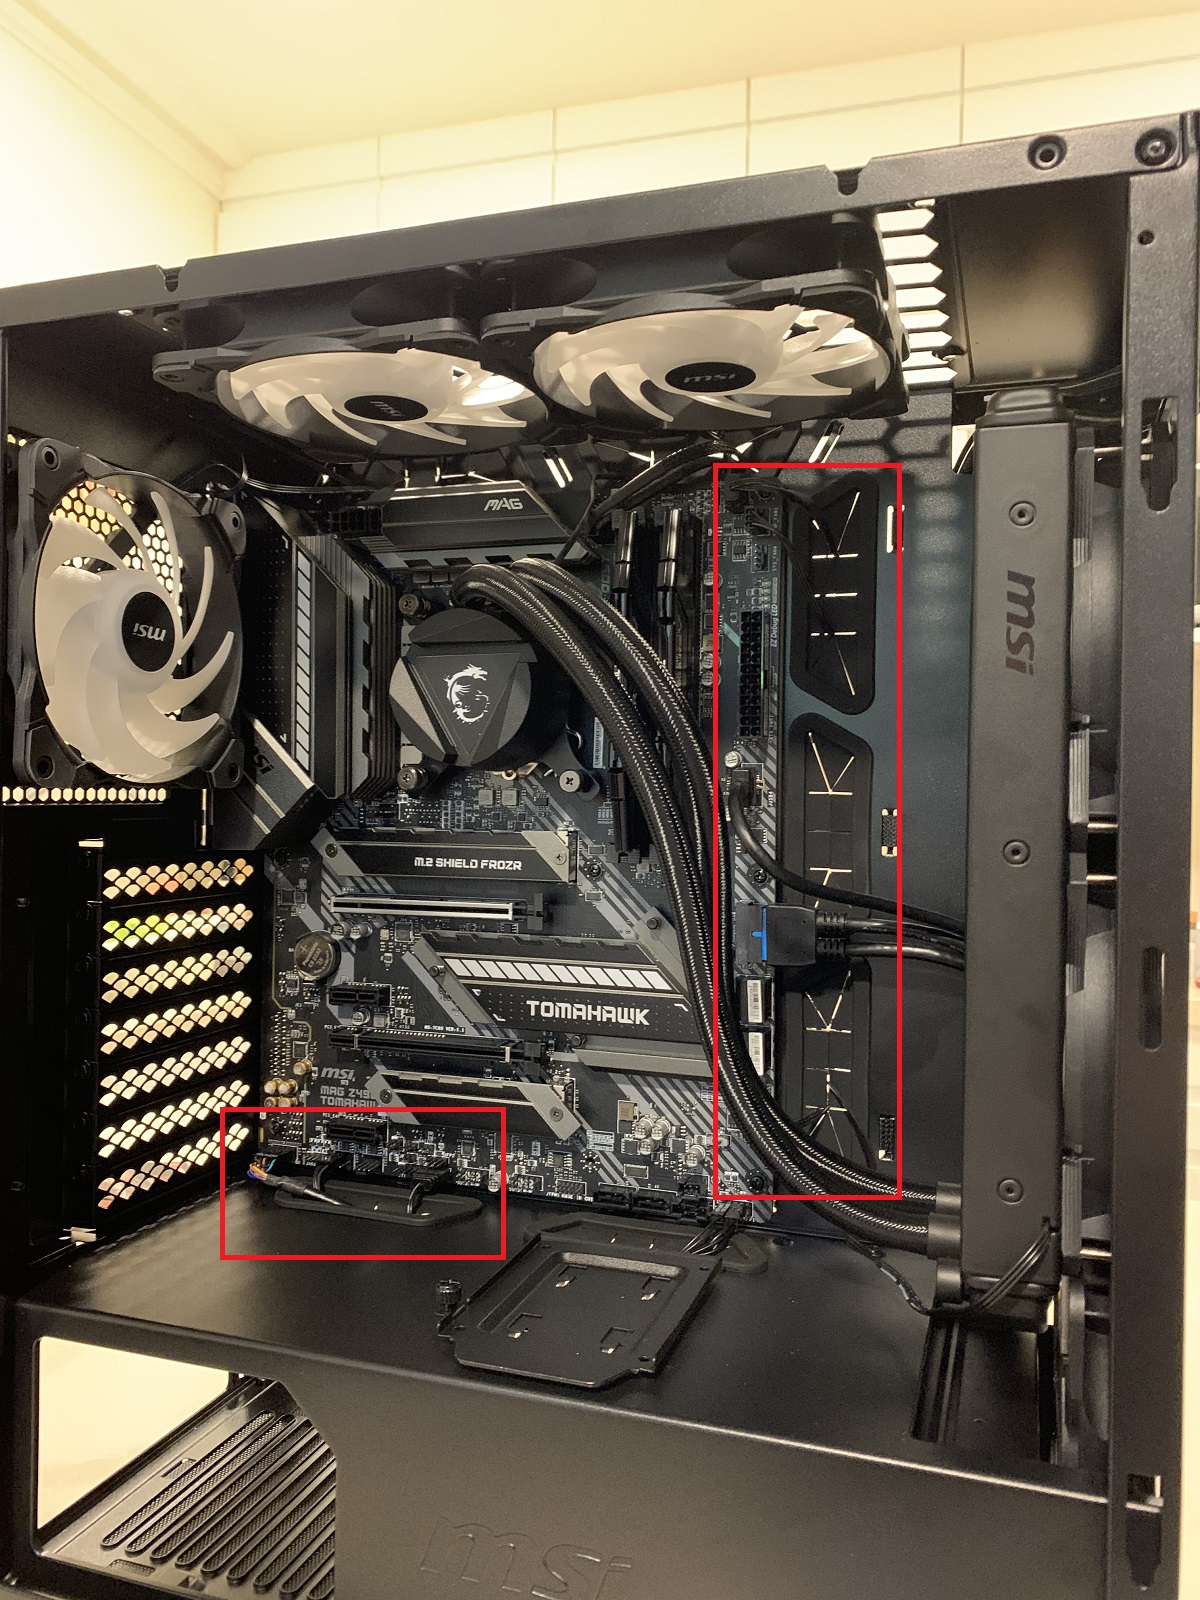
The biggest piece of advice I can give you is to keep everything as clean as possible by threading wires from things like fans to the other side (behind the motherboard) of the case and threading them back through to the motherboard close to where they connect. This way, you won’t have a web of wires clogging everything up. It looks way nicer, reduces places for dust to gather and will keep airflow as efficient as possible.
You can kinda see how I’ve done this below. Wires come through the rubber grommets and plug straight into where they need to go.
When it comes to fans and AIO coolers, I’ll call on this video again as a good demonstration of how to hook everything up. For wiring switches and USB ports on the front panel, the video below is a great guide for interpreting your motherboard’s manual and putting it into practice.
Supply power with a power supply
Next up, you need to supply power to everything. Your PSU will very likely come as a modular unit — a single box with a heap of cables. It looks overwhelming, but once you know what you need, it should make sense. You’ll need plugs for the CPU, motherboard, GPU, fan RGB and any extras you’ve included like SATA hard drives, etc.
The video below will help you figure all of this out.
Once you’ve plugged everything in, you just screw the PSU into place at the bottom of your case being sure to point its fan towards the vent at the bottom of your case. It’s ok if this means the PSU is upside down.

The GPU cherry on top
The last thing I like to plug in is the GPU, which is almost as easy as the RAM. Just unscrew the corresponding back panels from your case (in most cases, 2 of them) and just slot the card into the top PCIe slot until you hear it click. Then plug in the PCIe cables from your power supply and you’re good to go. Most current cards will need 2 x 8-pin connectors from your PSU, but the manual for your GPU should clarify this.
The video below will help you with this.
That’s it, baby, you’ve just built a PC. Look at you go! Chuck your case back together and power it all up.
I won’t go through what you should do now, but the video below has everything you need to know about that process, particularly ensuring that the RAM you bought is running at the speed you paid for.
Other things you might need for a gaming PC
If this is your very first PC, you’ll also need to get a few more things. Importantly, you’ll need a monitor.
Personally, I don’t think 4K is worth bothering with just yet, but you can probably do better than 1080p. 1440p gaming is the sweet spot. It’s the resolution between HD (1080) and 4K and it looks fantastic without putting too much strain on your PC. A monitor with a 144Hz refresh rate is also worth looking into and will make your games look silky smooth when they run at high framerates.
I use the ViewSonic XG2703-GS 27-inch monitor but only because I was hella lucky and won it in a competition. If I had to buy one now, I’d probably go with something like this LG Ultragear 27GL850-B 27-inch monitor, which is pretty much the same as mine only cheaper at $765. It’s also compatible with Nvidia’s G-Sync technology, which reduces screen tearing at high frame rates.
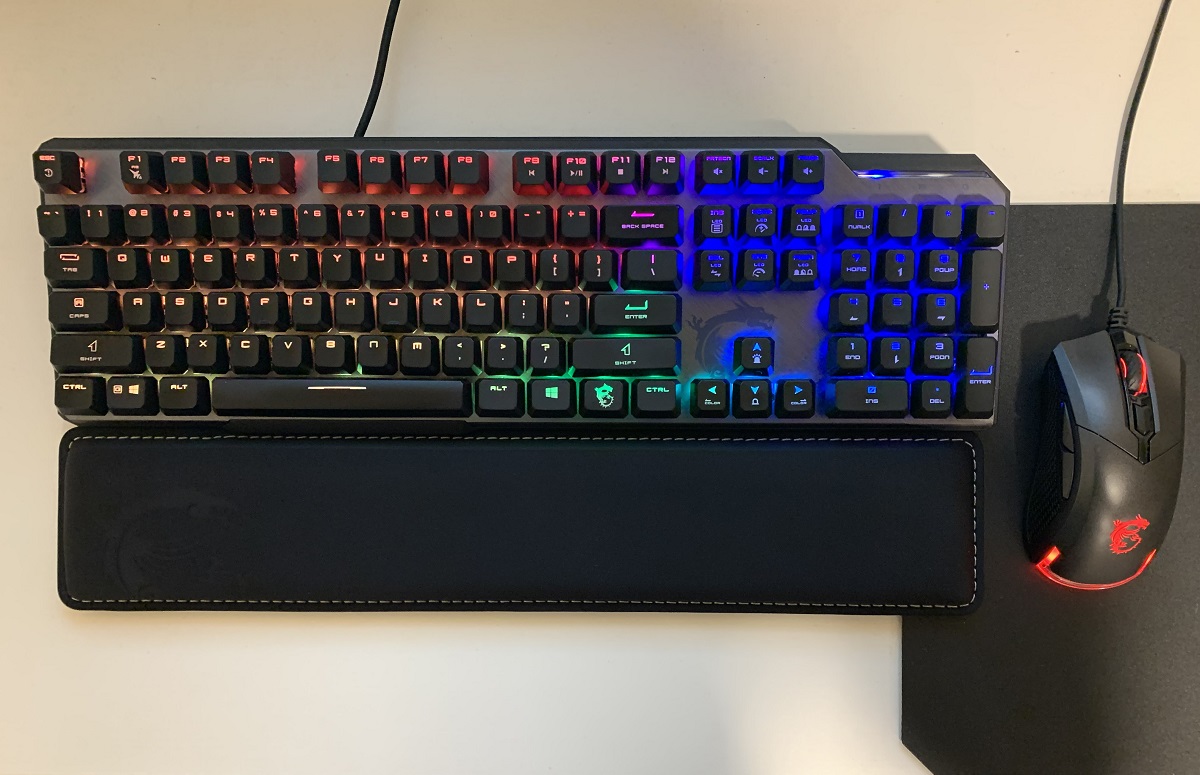
When it comes to your keyboard, there are a lot of choices. I’m using the MSI Vigor GK50 Elite RGB Mechanical Gaming Keyboard, which has some wild RGB light settings that really compliment the rest of my rig. Lot’s of people — myself included — like to use mechanical keyboards because they’re more tactile and operate faster than a standard keyboard. They also make the most satisfying clickity-clack sounds which make my brain go brrr.
For the mouse, I’m using the MSI Clutch GM50, which is comfortable and also features programable RGB lighting.
You’ll probably also wanna grab a set of gaming headphones. You don’t have to go crazy, but I’d recommend something with a microphone for gaming with mates.
That pretty much wraps it up, folks. Happy gaming PC building!